


What a difference 1000 ºC makes
Or the beginning of the end of a making cycle

Hi and welcome to this week’s newsletter!
If you are new here, a very warm welcome to Clay on my mind!
If you haven’t already, you may want to read a bit more about me and what to expect from Clay on my mind here and in the About tab
The past two weeks have been exactly what you would expect of the last week of Summer and the first week of Autumn: first, warm and sunny days and warm nights, then, sudden drop in temperatures, grey skies and cold nights. Summer reluctantly saying goodbye and Autumn making a grand entrance.
Some tomatoes (the last of the very few that made it) actually managed to mature to a nice shade of red, but now it really is time I cleared the bed and either leave it alone until Spring or sow some Winter greens…
These two weeks have also marked the beginning of the end of a cycle in the studio: a making cycle. I finally filled the kiln and fired it to 1000 ºC, turning the raw clay into a bisqued ceramic body, no longer water-soluble but still porous and not yet water-tight. In other words, if submerged, the pieces will no longer turn into mud but they won’t fully hold water either.
Basically, bisque fire is the point of no return.
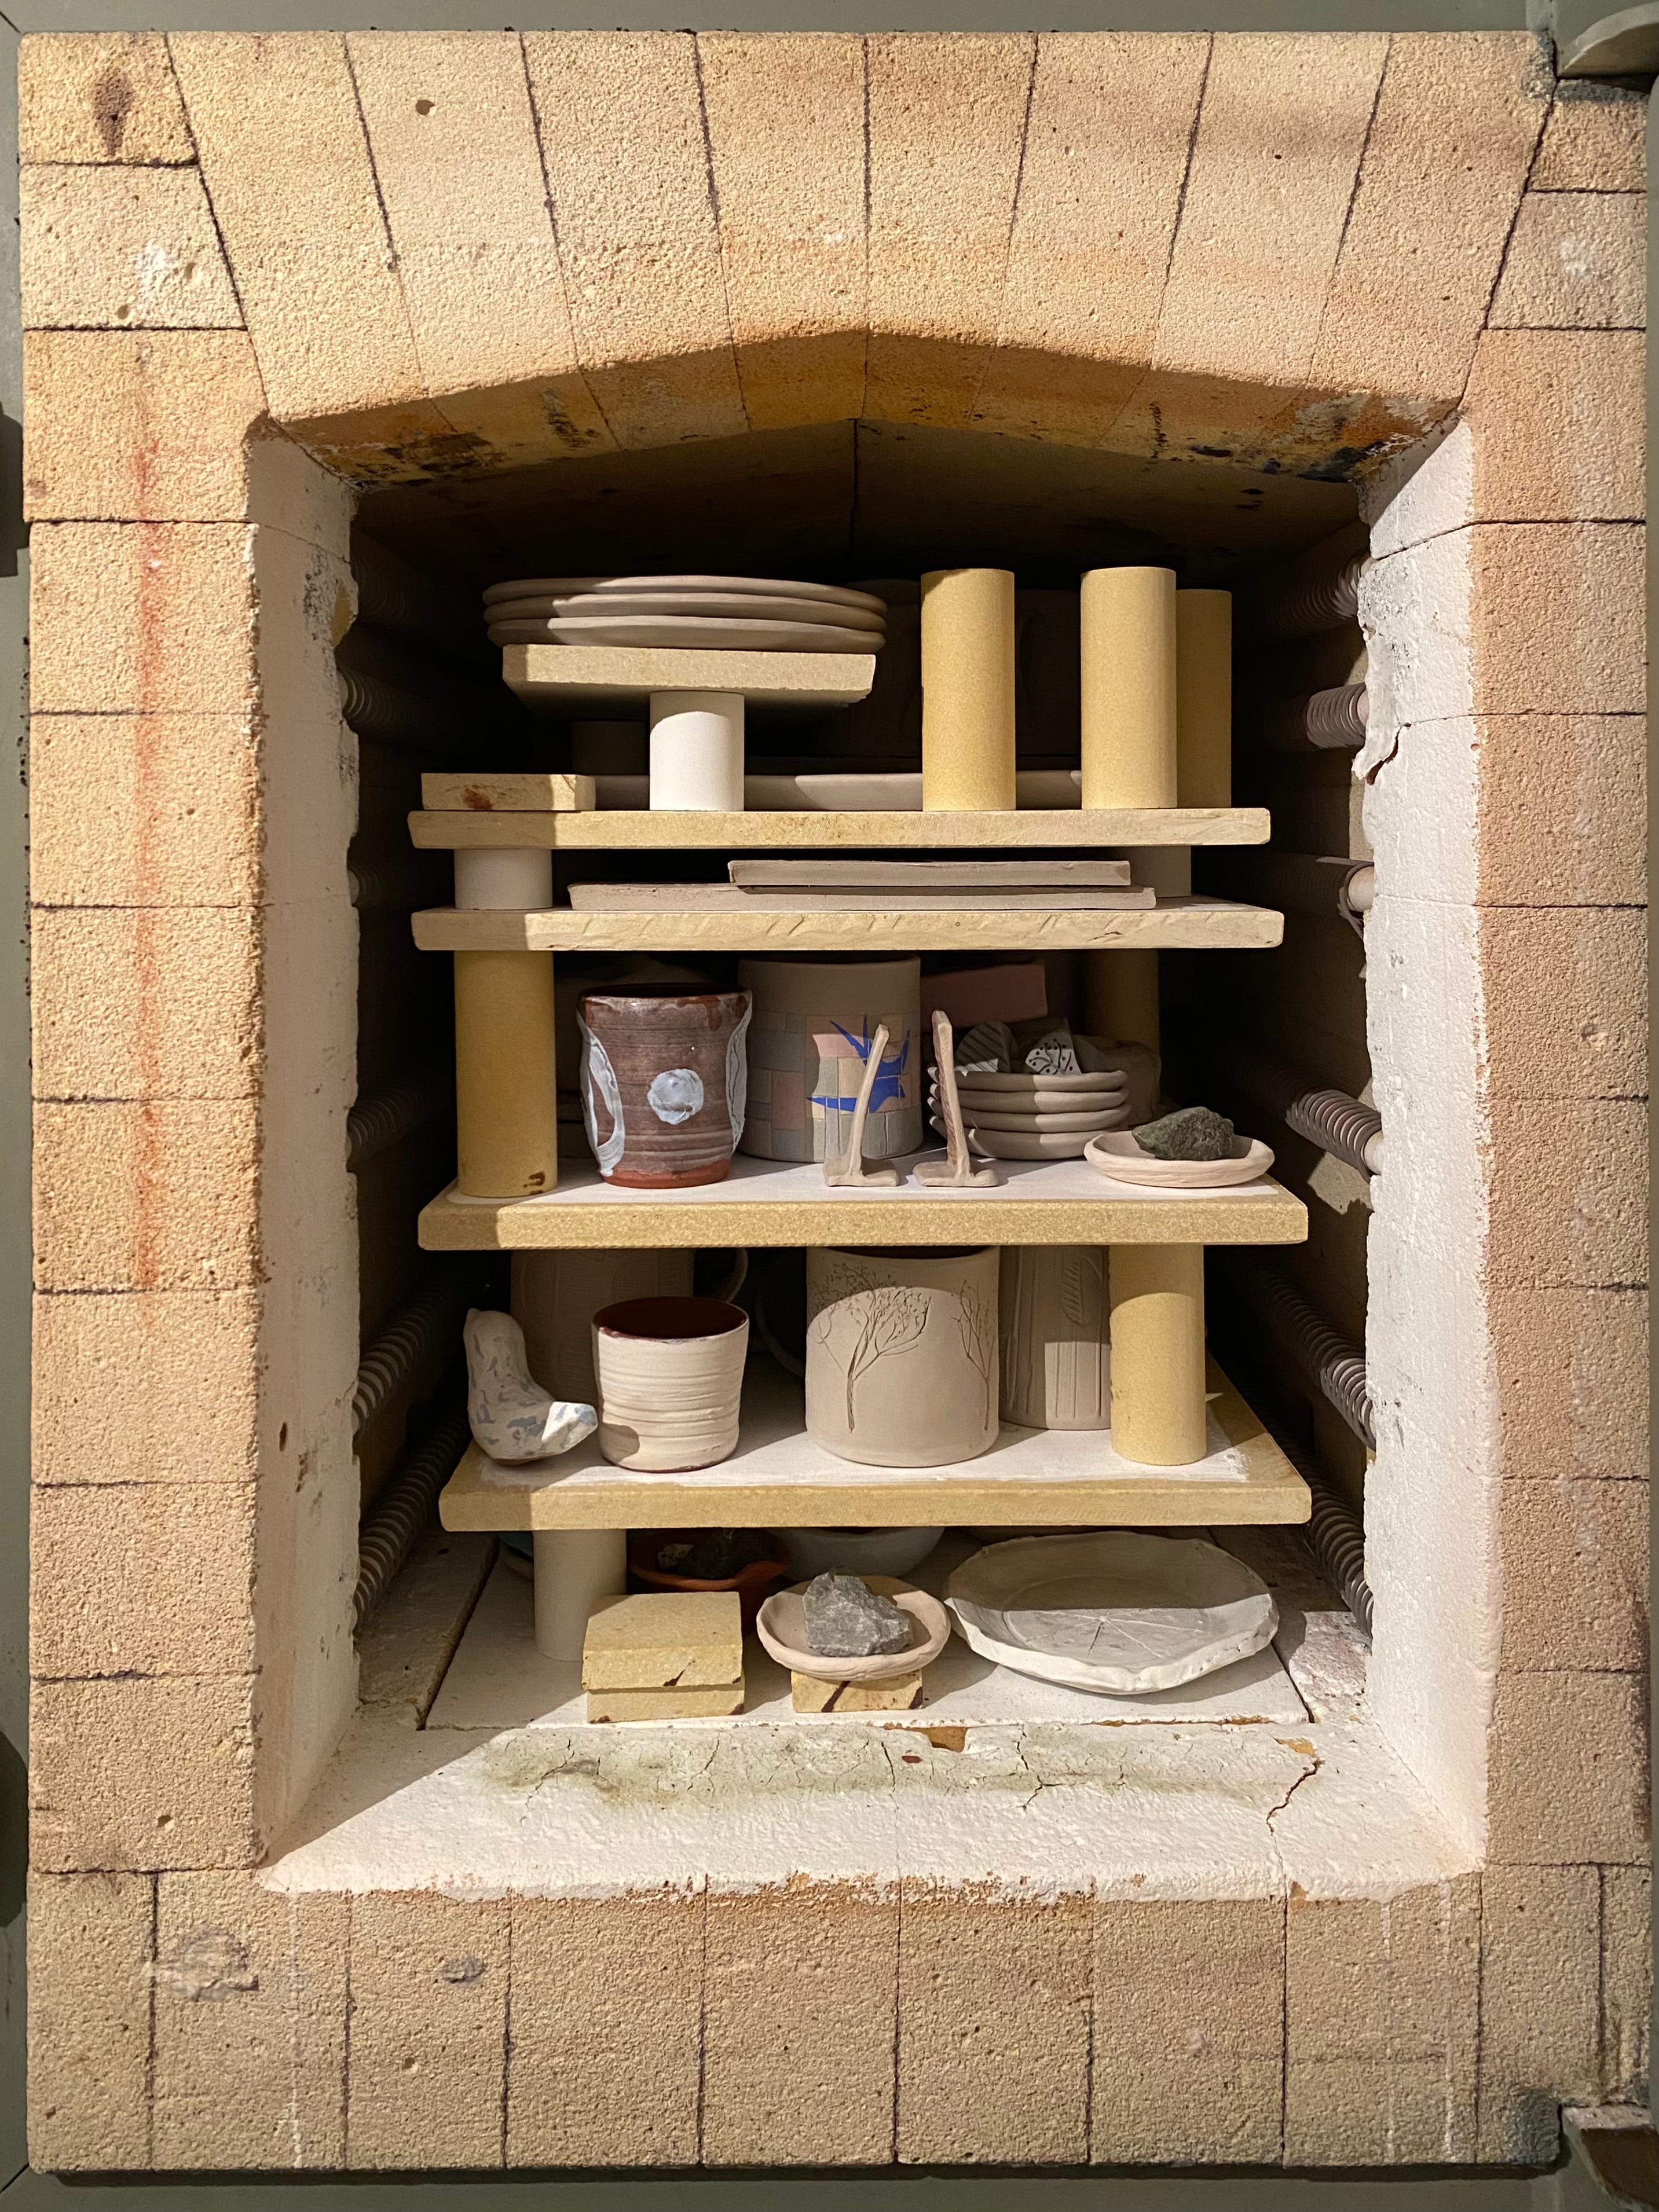
Loading
Loading the kiln always takes longer than I plan but, like everything else in pottery, it can’t be rushed. It is also a last opportunity to check the pieces, make sure I didn’t miss something, that they really are as they are supposed to be, no wobbly trays or plates (unless they are meant to be wobbly, of course!), no sharp bits on the rims or feet of the mugs, no misshapen handles.
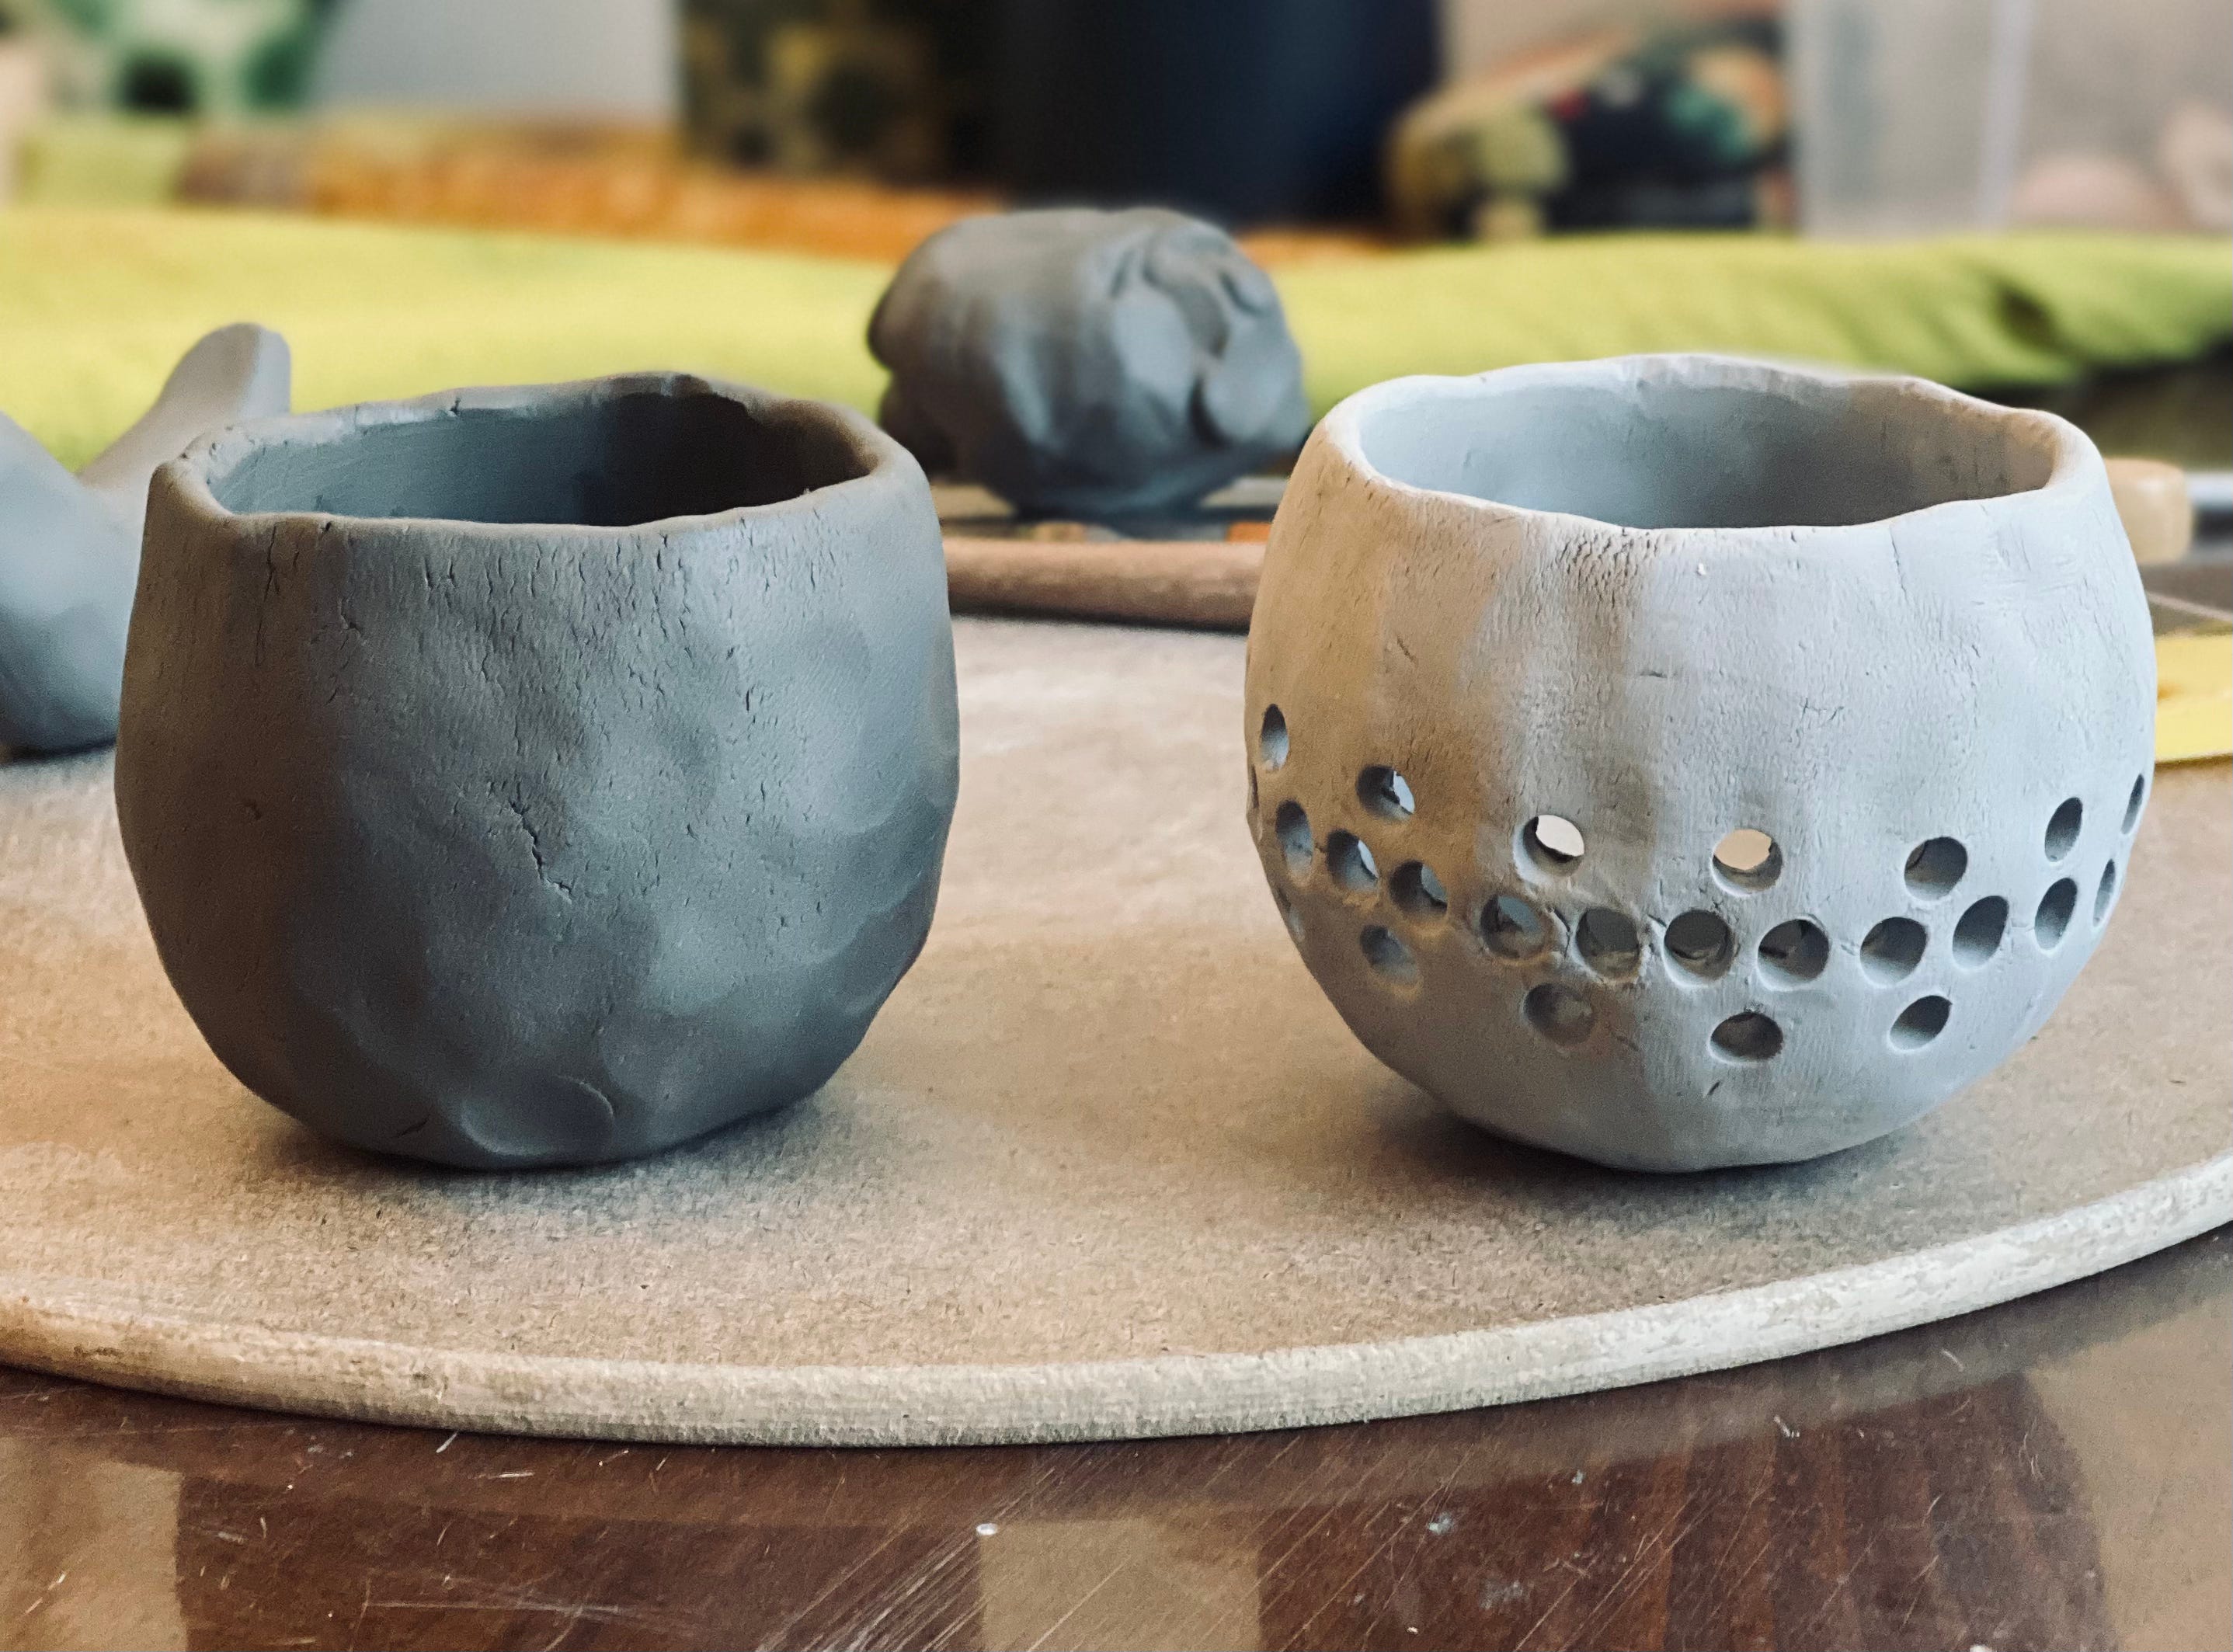
At this point, the clay can still be reclaimed, so sometimes it is better to give up on a piece that will only get worse after firing. And, although I am not a perfectionist, my standards have changed over the last years and I no longer fire every single piece I make.
Sometimes, a piece is not obviously faulty but I am not sure it’s really how I wanted it to be so I may hold on to it, keep it on the shelf and look at it from time to time. Some pieces can grow on you. This time, although I really wanted to have more than two of the elderflower mugs (you can see a previous set I made, here, on Instagram), the third one would not have looked good after firing, and could even possibly have cracked. At the end of this post, you can watch it making its way to the reclaiming bucket (where there was already a fellow reject) in a rather satisfying way. This mug would not have grown on me — it was a clear candidate for total destruction.
Firing
The firing itself can take anywhere between 8 and 12 hours, depending on your firing program (and style?). My firing schedules have evolved and I am still learning and making adjustments.
When I first got the kiln and started firing it, I didn’t really know what I was doing… I asked the potter who had been firing my pieces until then, and used his schedule. Over time, as I have read and learned more about the different firing curves and how a fast rising curve can have a very different result from a slow rising curve, I have adapted the original schedule. Now, instead of a 9 hour bisque fire to 940 ºC, I run the kiln for about 11 hours to 980/1000 ºC (my kiln is not new and temperatures fluctuate a lot inside — this is something I will need to address at some point…).
Cleaning
So… Eleven hours. That is enough to thoroughly clean the studio, which is exactly what I did.
After creating a total mess making and decorating pieces, I spent the good part of a day ridding the studio as much as possible of clay dust. I cleared all surfaces of tools, bats, brushes, papers and got it ready for the next phase: glazing.

Waiting
After starting the kiln, there is waiting to be done. And much going down and up the basement stairs — the kiln is in the basement, not sure if I already mentioned that —checking on the temperature…
After the kiln shuts down, more waiting…
The cooling process takes about 24 hours. Usually, after the bisque firing, I am able to open the kiln about 34 to 36 hours after starting it. By this time, the temperature inside the kiln is just below 100 ºC; the door can be opened a few centimetres, just enough to take a peek inside and make sure nothing has exploded. After that, I leave it ajar so the inside cools a bit faster.
Unloading
When the inside temperature is about 50 ºC, I start to take things out. It takes considerably less time to empty the kiln than it takes to load it, and once I have carried everything up the stairs to the studio, I lay all the pieces on the table and go to bed. That’s not me being weird — it’s just that we always start the kiln in the morning and so, when it’s cool enough to open and unload, it’s late evening/night the next day.
Appraising
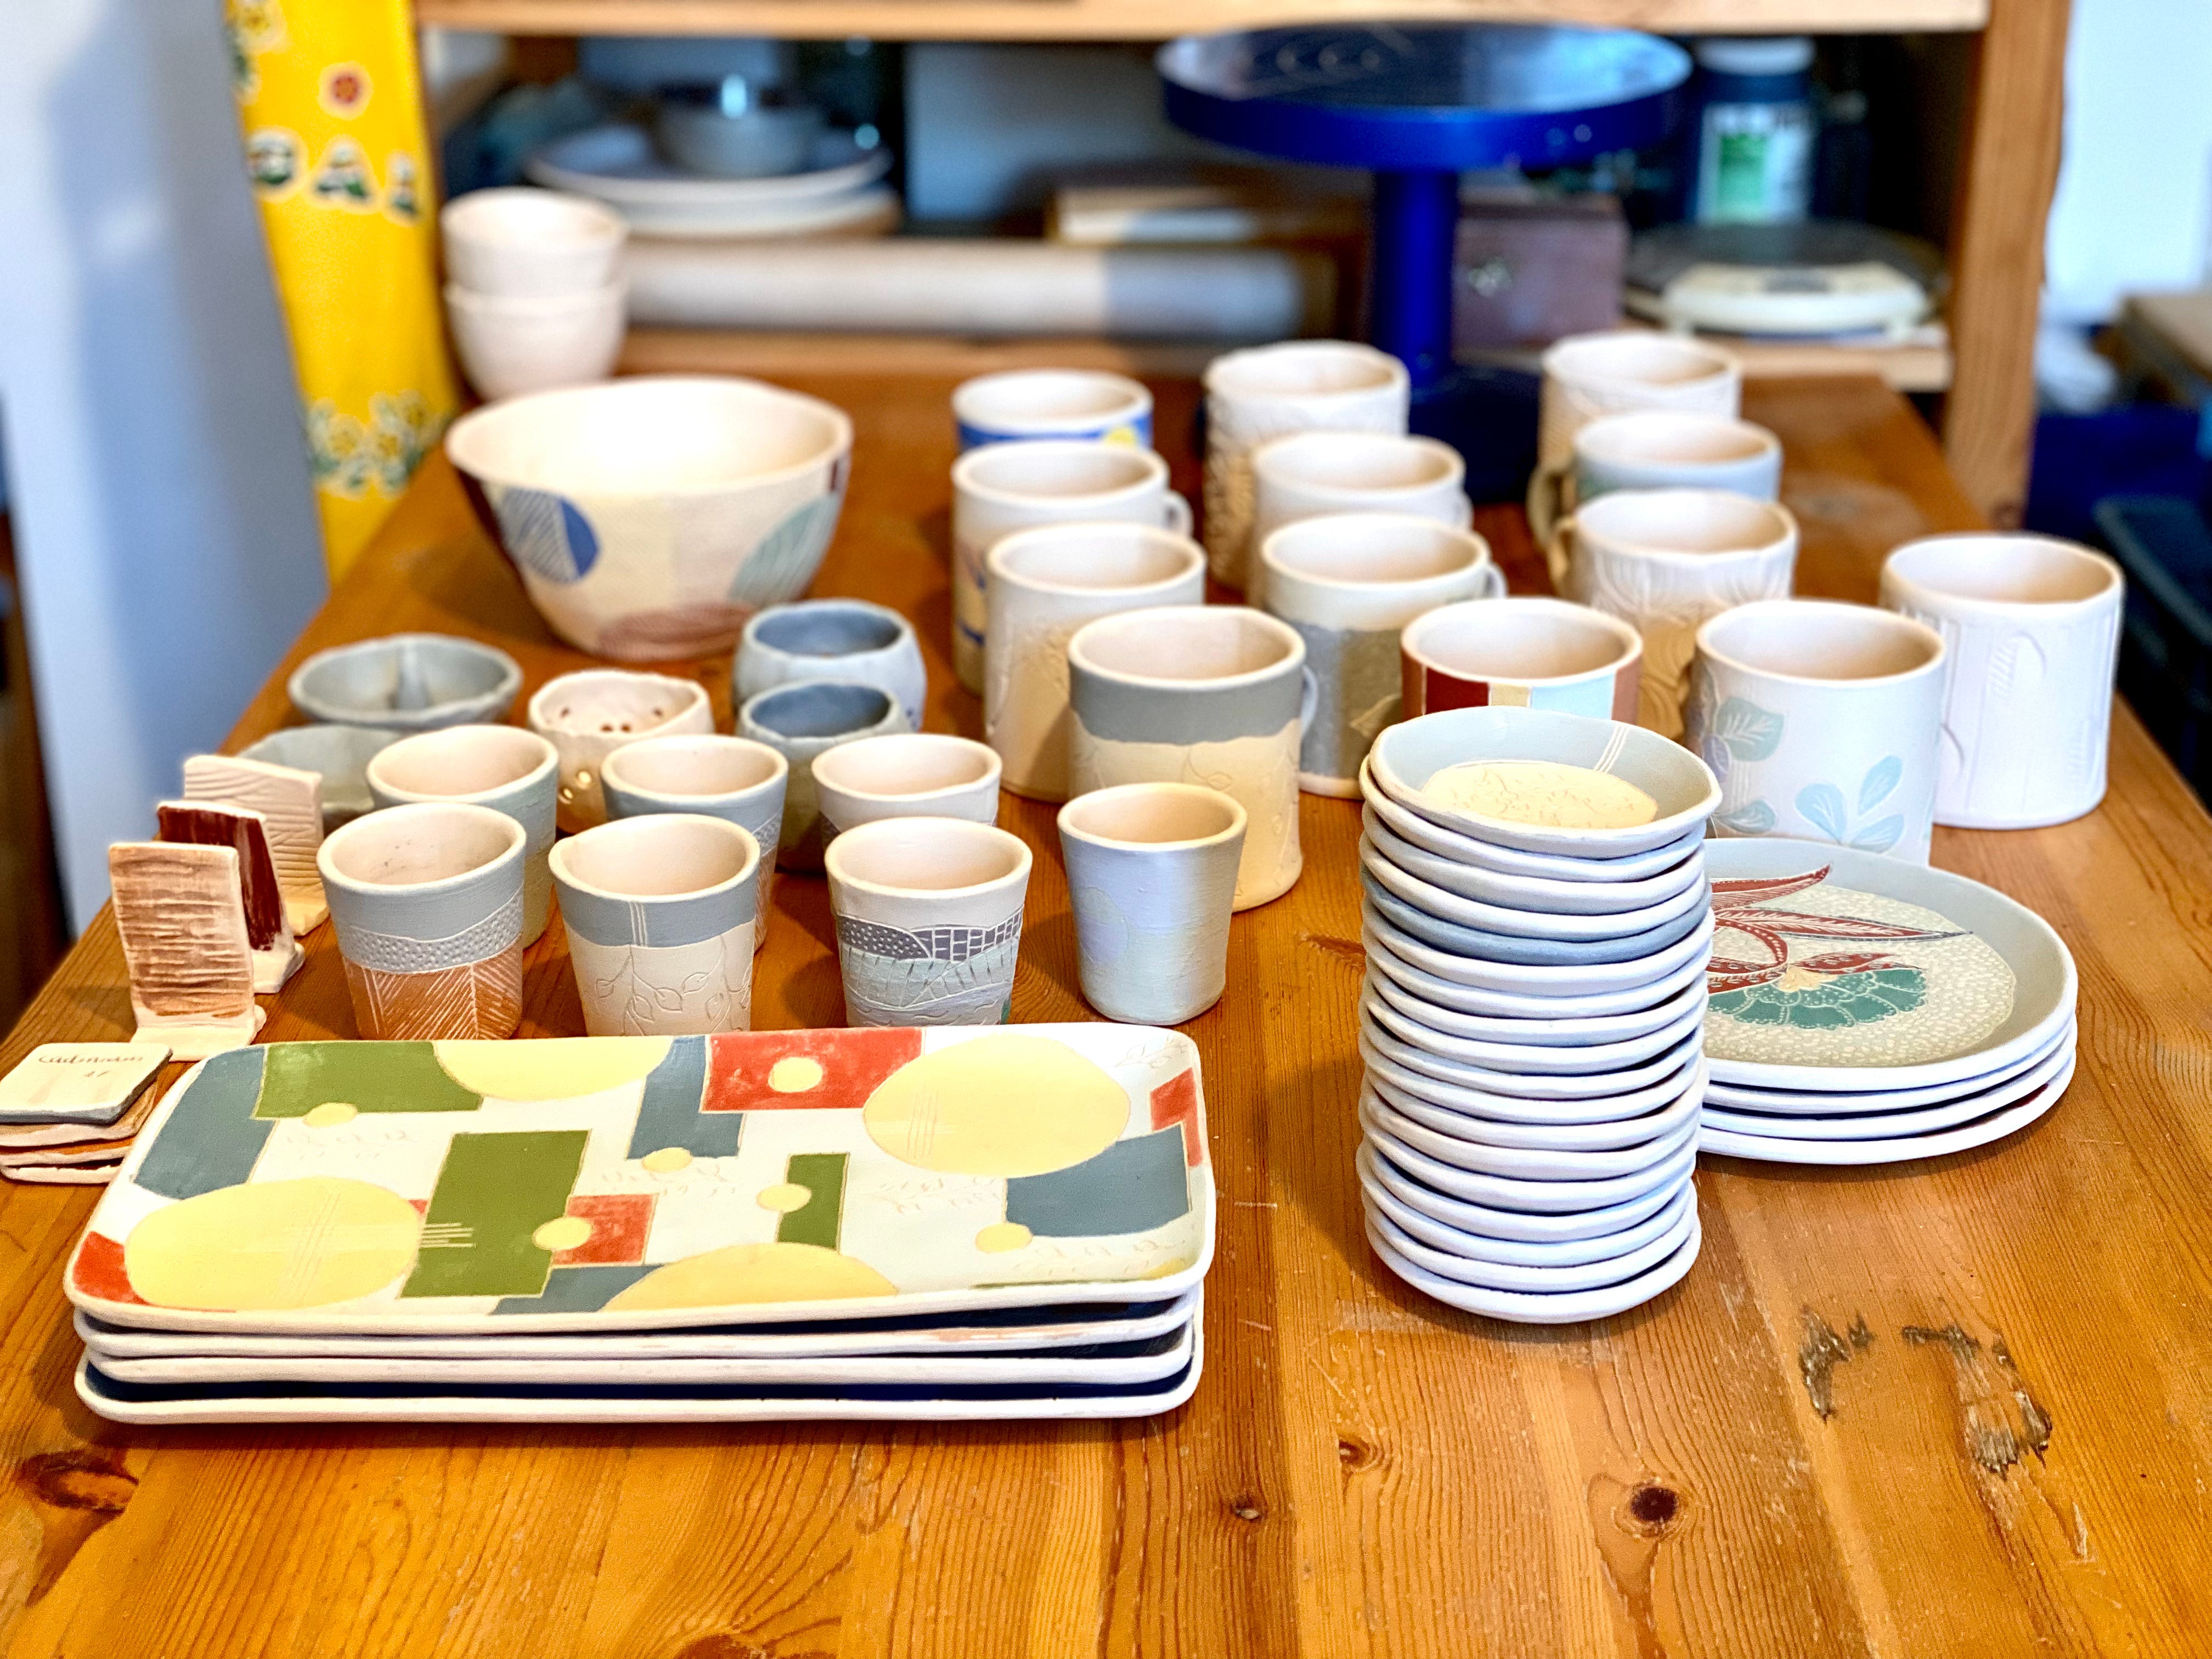
The next morning, I go through the pieces one by one, and check them carefully. It has happened before that a piece looks fine when I first take it out of the kiln but then, on closer inspection, I find small cracks (this is more common on plates and platters) or faults that usually mean the end of the line for a piece. Faults and cracks don’t get smaller after the second firing so there’s no point in glazing them. This hasn’t happened to me very often — in fact, more often it’s after the glaze firing that small cracks make themselves visible, condemning the piece to a life-long service in my own kitchen…
I was very happy with the results of the firing. Everything was intact and evenly fired, except for two of the large texture slabs from a potter friend who needed kiln space. I fired them on top of each other, which I didn’t think would be a problem. But… they were quite thick, and the centre of the one that was on the bottom looked like it hadn’t reached the same temperature as the edges. Hopefully, this won’t present a problem (I’m sure she’ll let me know if it does) since they are only meant to be used to texture slabs and won’t be glazed themselves.
I was particularly ecstatic about the three smallest pieces: the three test tiles with the slips made from the wild clay I collected in Porto Santo.


I am happy to report that they not only made it through 1000 ºC, they look great! It’s always a surprise to see how the different clays change colour after firing and these did not disappoint. My head is already buzzing with ideas for pieces entirely decorated with only these slips! First though, I need to glaze them and put them through the next test: the slightly higher temperature of 1150 ºC.
Calcining
There is one more thing that went into this firing that I would like to tell you about.
Along with using wild clay in my pottery, I would also love to make my own glazes from local or found materials. But it’s not a simple subject (is anything in ceramics?!) and, since I am learning on my own, it’s a looong process.
I collected the rocks below on a trip some time ago and now they have finally gone through calcining, the process of heating them below melting point (in the bisque firing) and allowing them to cool down. After this, depending on the type of rock, they can just be crumbled by hand. Then, and this part involves heavy equipment which I don’t have at the moment, they can be crushed and turned into dust fine enough to mix with other materials to make a glaze. And then they will need to be fired to a higher temperature than the one I am now taking my kiln to, which will require a leap of faith on my part.
So, like the ashes from plants I burned a while ago, these will sit in my studio for now. And, one day hopefully in the not so distant future, I will write a post on wild glazes which I will share with you (in the meantime, if I piqued your interest and you would like to find out more, you can read this and this, and, if you are not afraid of going down this particular rabbit hole, you can always google “glazes from rocks” or “wild glazes”).


For now, though, I just wanted to show you the before and after. Isn’t it cool how the rocks that were hard as a… well, rock, are now as crumbly as sand? Amazing, right?
Before I go, here is the (very) short video I promised earlier — call it your moment of zen.
As always, thank you so much for reading. I hope you enjoyed taking a peek into my kiln and into another stage of the making cycle. Next time, I will talk a bit about glazing and hopefully there will be pictures of the finished pieces.
Let me know if you have any questions or comments below or hit reply if you are reading this in email. Oh! and do hit the heart button if you enjoyed reading — it puts a smile on my face and helps spread the word.
That’s it from me this week. Take care of yourself and enjoy the change of the seasons, wherever you are in the world. And, if you have the chance
go play
with clay —
it will make your day! ;)
Sara xx
If you would like to see my work
I’m on Instagram, and have an Etsy store where you can find some pieces created in my small home studio.
And if you think your friends would also enjoy reading Clay on my mind, consider sharing it with them.
Fica muito claro, no que (d)escreves, que o processo criativo precisa, para obter os resultados pretendidos, de assentar no domínio de técnicas em que a gente como eu - não criativa, digamos - não pensa. Gostei muito da maneira como "falas" das tuas acções em todo o processo: há um cuidado, uma dedicação, um afecto em todos os teus gestos, na tua relação com o barro. Obrigada!
That yellow/ochre slip is 😍 A fascinating read as ever, thanks Sara. x